# FortiGate

# Enable SNMP Monitoring

##### 1. Go to *System* -&gt; *SNMP*

[![image.png](https://kb.oliver-karger.de/uploads/images/gallery/2025-07/scaled-1680-/NhHimage.png)](https://kb.oliver-karger.de/uploads/images/gallery/2025-07/NhHimage.png)

##### 2. Go to *SNMP v1/v2c* and click **Create New**

[![image.png](https://kb.oliver-karger.de/uploads/images/gallery/2025-07/scaled-1680-/N6fimage.png)](https://kb.oliver-karger.de/uploads/images/gallery/2025-07/N6fimage.png)

##### 3. Set a Name, enter your Allowed Hosts and Ports

[![image.png](https://kb.oliver-karger.de/uploads/images/gallery/2025-07/scaled-1680-/AB0image.png)](https://kb.oliver-karger.de/uploads/images/gallery/2025-07/AB0image.png)

##### 4. Allow SNMP on the respective Interface of the Firewall

[![image.png](https://kb.oliver-karger.de/uploads/images/gallery/2025-07/scaled-1680-/kJAimage.png)](https://kb.oliver-karger.de/uploads/images/gallery/2025-07/kJAimage.png)

[![image.png](https://kb.oliver-karger.de/uploads/images/gallery/2025-07/scaled-1680-/uUFimage.png)](https://kb.oliver-karger.de/uploads/images/gallery/2025-07/uUFimage.png)

# Policy based IPsec VPN (IKEv1)

#### What will be done

- Setup a IKEv1 Remote Access VPN with PSK + XAuth Authentication
- Policy-based Split Tunneling

#### Prerequesits

- Static IP
- Port 500 (UDP) for IKE open
- Port 4500 (UDP) for NAT-T open
- ESP open
- User Group for XAuth

<p class="callout info">I'll be referring to this Tunnel as VPN-RA-Test. Give it whatever name you need!</p>

### 1. Creating a VPN Tunnel

1. Go to VPN - IPsec Tunnels
2. Click Create New and select IPsec Tunnel 
    - Template Type: Custom
    - Name: VPN-RA

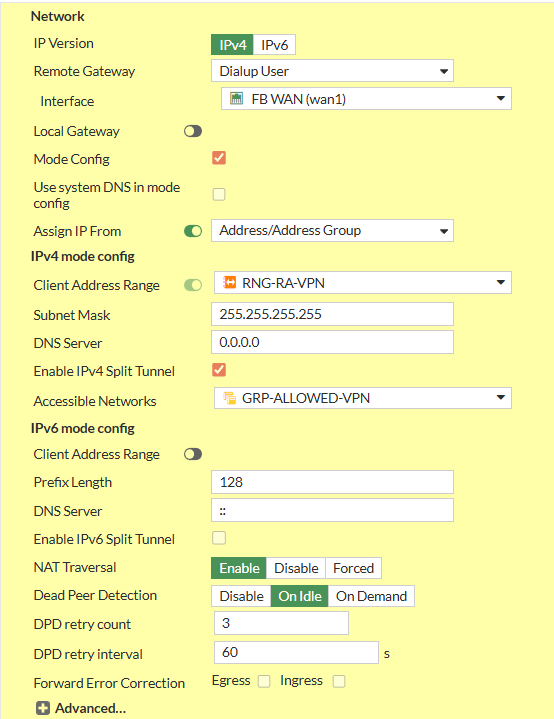
#### 1.1. Network Settings

- 1. Set *IP Version* to **IPv4**
    2. Set *Remote Gateway* to **Dialup User**
        - Interface: Your WAN Interface
    3. Disable *Local Gateway*
    4. Enable *Mode Config*
    5. Set *Client Address Range* manually or Assign Range Address Object
    6. Set *Subnet Mask* `255.255.255.255` to prevent Inter-Device Communication inside the Tunnel or specify explicitly
    7. Set your preferred DNS Server.
    8. Enable *Enable IPv4 Split Tunnel*
        - Select your Address Object representing the Networks that should be accessable
    9. Disable *IPv6 Mode Config* - *Client Address Range*
    10. Set *NAT Traversal* to **Enable**
    11. Set *Dead Peer Detection* to **On Idle**

[![image.png](https://kb.oliver-karger.de/uploads/images/gallery/2025-09/scaled-1680-/MfSimage.png)](https://kb.oliver-karger.de/uploads/images/gallery/2025-09/MfSimage.png)
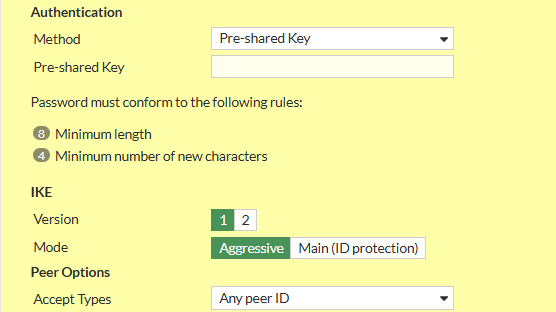
#### 1.2. Authentication

1. Set *Method* to **Pre-shared Key**
2. Write your PSK to the *Pre-shared Key* Input Field
3. Set *IKE* - *Version* to **1**
4. Set IKE - *Mode* to **Agressive**
5. Set *Peer Options* - *Accept Types* to **Any Peer ID**

[![image.png](https://kb.oliver-karger.de/uploads/images/gallery/2025-09/scaled-1680-/v2Bimage.png)](https://kb.oliver-karger.de/uploads/images/gallery/2025-09/v2Bimage.png)
<p class="callout info">You can set a Peer ID here to differentiate different Tunnels that might share Settings and/or PSKs</p>

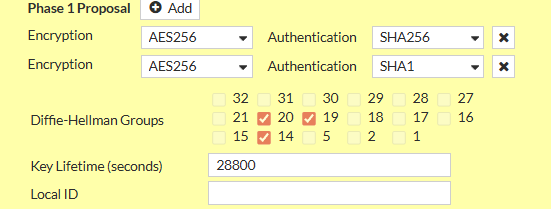
#### 1.3. Phase 1 Proposal

<p class="callout info">Remove all existing Phase 1 Proposals beforehand by clicking the **X** Button the right side</p>

1. Add the following Proposals 
    - Encryption: **AES256**, Authentication: **SHA256**
    - Encryption: **AES256**, Authentication: **SHA1**
2. Check *Diffie-Hellmann Groups* **14**, **19**, **20**
3. Set *Key Lifetime (seconds)* to **28800**

[![image.png](https://kb.oliver-karger.de/uploads/images/gallery/2025-09/scaled-1680-/PIVimage.png)](https://kb.oliver-karger.de/uploads/images/gallery/2025-09/PIVimage.png)
#### 1.4. XAuth

1. Set *Type* to **Auto Server**
2. Set *User Group* to **Inherit from policy**

[![image.png](https://kb.oliver-karger.de/uploads/images/gallery/2025-09/scaled-1680-/h03image.png)](https://kb.oliver-karger.de/uploads/images/gallery/2025-09/h03image.png)

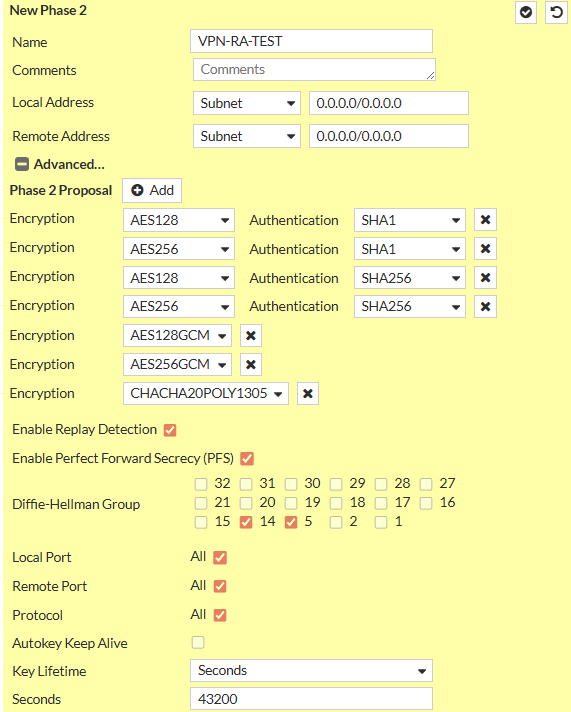
#### 1.5. Phase 2 Selectors

<p class="callout info">There should only be one Phase 2 Selector pre-existing with the Name of the Tunnel you specified</p>

##### 1.5.1 Edit Default Phase 2 Selector

1. Click on the Pen Icon at the Right Side of the Row to Edit
2. Expand the Advanced Menu by clicking on *Advanced*

1. Set *Name* to **VPN-RA-P2**
2. Set *Local Address* to Type **Subnet** and Value `0.0.0.0/0`
3. Set *Remote Address* to Type **Subnet** and Value `0.0.0.0/0`
4. Delete all existing Phase 2 Proposals
5. Add the following Phase 2 Proposals (same as with Phase 1) 
    - Encryption: **AES256**, Authentication: **SHA256**
    - Encryption: **AES256**, Authentication: **SHA1**
6. Enable *Enable Replay Detection*
7. Enable *Enable Perfect Forward Secrecy (PFS)*
8. Check *Diffie-Hellmann Groups* **14**, **19**, **20**
9. Enable *Local Port*
10. Enable *Remote Port*
11. Enable *Protocol*
12. Set *Key Lifetime* to **Seconds** and set `3600`

[![image.png](https://kb.oliver-karger.de/uploads/images/gallery/2025-09/scaled-1680-/yHximage.png)](https://kb.oliver-karger.de/uploads/images/gallery/2025-09/yHximage.png)
### 2. Create Policies

For a Policy-based IPsec VPN you need Policies that allow both the Address Range of the Clients and the Users to access the Networks you need.

Depending on the Networks you specified, you need Policies from WAN-&gt;LAN and maybe WAN-&gt;OtherLAN.

#### 2.1 Example Policy

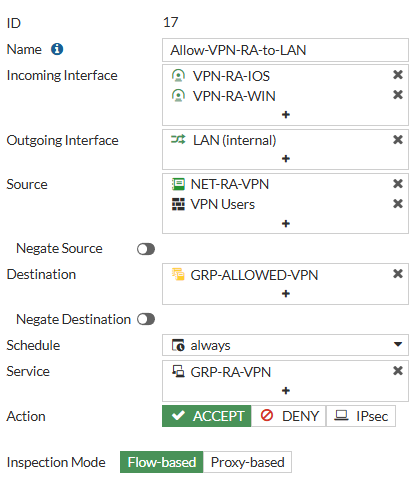
This is an Example Policy from WAN to LAN

I use Address Objects here that i also specified in the Tunnel Configuration.

<p class="callout info">Note: You cannot specifiy Subnet Address Objects in the Tunnel Configuration, only IP Ranges. But if the Subnet contains the IP Range, this works fine. Example: Range is 192.168.10.100 - 192.168.10.200 so a Subnet of 192.168.10.0/24 would work just fine</p>

[![image.png](https://kb.oliver-karger.de/uploads/images/gallery/2025-09/scaled-1680-/kF5image.png)](https://kb.oliver-karger.de/uploads/images/gallery/2025-09/kF5image.png)

Here my Policies allows Traffic from the VPN Tunnel Interfaces (created when creating the Tunnel) to the LAN Interface. As here, Authentication is Policy-based, for the Source we also need the User/User Groups.

Destination is a Group i created that is the same i used for the *Split Tunneling* - *Accessable Networks*

You can also specify a Schedule or Service if you want to.

<p class="callout warning">You need Policies in both Directions for them to work correctly!</p>

# Virtual Server Reverse Proxy

#### What will be done

- Using a FortiGate to act as a Reverse Proxy, forwarding `domain.tld` to `ip:port`

#### Prerequesits

- Static IP
- Port 443 (TCP) for HTTPS open

<p class="callout info">In this Example, Forgejo will be used as Application</p>

### 1. Creating a Virtual Server

1. Go to Policy &amp; Objects - Virtual Servers and Click Create New
2. Set a Name

#### 1.2 Network Configuration

1. Set *Type* to **HTTPS**
2. Set *Interface* to your WAN Interface
3. Set *Virtual server IP* to your Public IP (or TN IP if behind a NAT Router)
4. Set *Virtual server port* to `443`
5. Set *Load balancing method* to **HTTP Host**
6. Set *Persistence* to **HTTP Cookie**
7. Enable *Preserve client IP*

[![image.png](https://kb.oliver-karger.de/uploads/images/gallery/2025-09/scaled-1680-/gSgimage.png)](https://kb.oliver-karger.de/uploads/images/gallery/2025-09/gSgimage.png)

<p class="callout info">You can add Health Checks for this Virtual Server here</p>

#### 1.3 SSL Offloading

As the FortiGate will be acting as Reverse Proxy in this Situation, SSL Encryption needs to be done at the Firewall. Select/Upload your SSL Certificate here and Set *Mode* to **Full**

[![image.png](https://kb.oliver-karger.de/uploads/images/gallery/2025-09/scaled-1680-/qHZimage.png)](https://kb.oliver-karger.de/uploads/images/gallery/2025-09/qHZimage.png)

#### 1.4 Real Servers

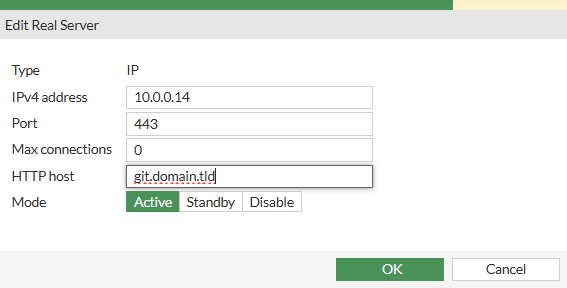
For each public Domain, create a Real Server here

Example: git.domain.tld

1. Click *Create New*
2. Set *IPv4 Address* to your internal Server IP Address
3. Set *Port* to your internal Server Port
4. Set *Max connections* to `0` for unlimited Connections or set a fixed limit
5. Set *HTTP host* to your public Domain
6. Set *Mode* to **Active**

[![image.png](https://kb.oliver-karger.de/uploads/images/gallery/2025-09/scaled-1680-/mNFimage.png)](https://kb.oliver-karger.de/uploads/images/gallery/2025-09/mNFimage.png)
### 2. Creating Firewall Policy

We need a Proxy-based Policy that allows WAN Access to the created Virtual Server

<p class="callout info">If you can't select your Virtual Server here, switch to *Proxy-based* Inspection Mode first.</p>

[![image.png](https://kb.oliver-karger.de/uploads/images/gallery/2025-09/scaled-1680-/Li8image.png)](https://kb.oliver-karger.de/uploads/images/gallery/2025-09/Li8image.png)

### 3. Application Configuration

Your Application needs to be able to accept Traffic to Port 80 with the specific Public Domain. As the FortiGate will handle SSL Encryption, you need to make sure your Application accepts plain HTTP without HTTP-to-HTTPS-Redirection

# SSL-VPN on custom Interface

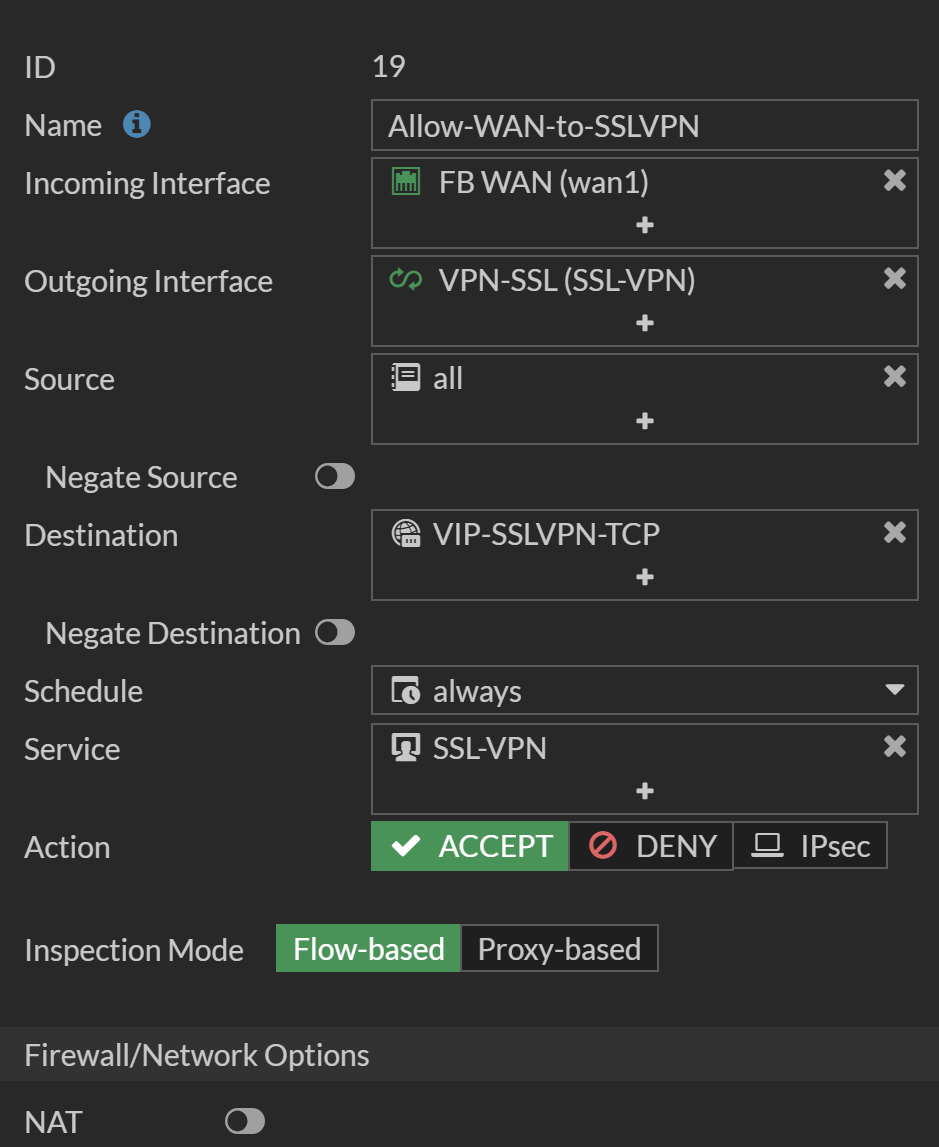
This explains how to setup the SSL-VPN on a FortiGate (E-Series) on a Custom Interface for better Controls.

This is done because per default, SSL-VPN Listens on the WAN Interface directly, therefor can not be controlled by any Policy.

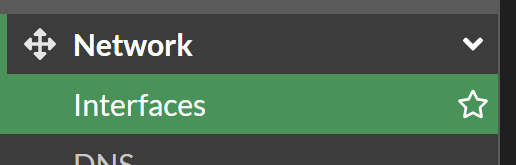
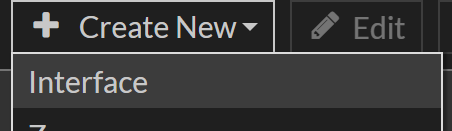
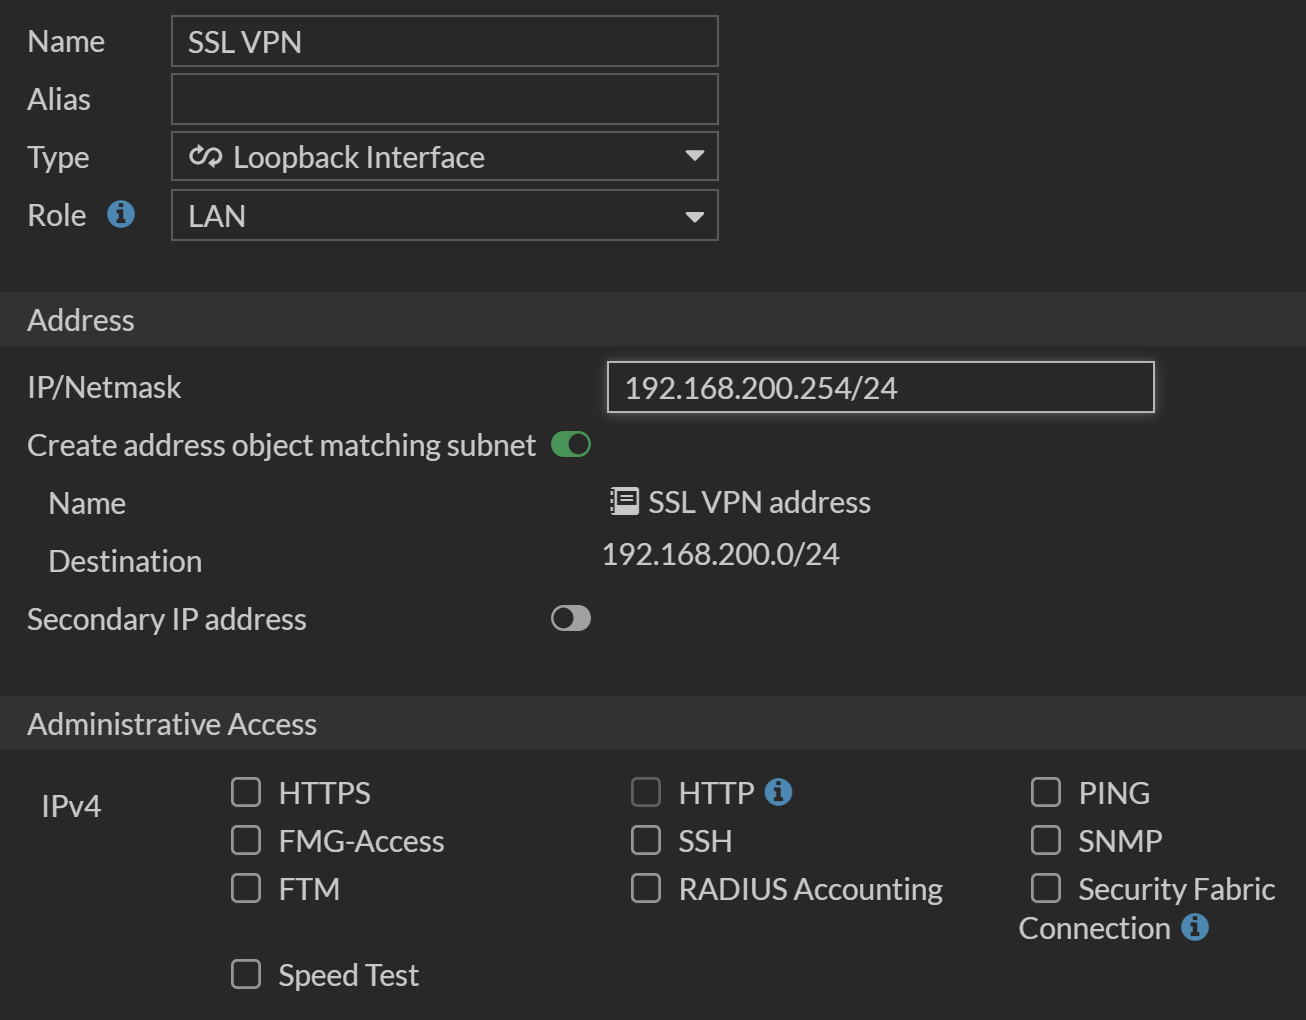
### Create Loopback Interface

[![image.png](https://kb.oliver-karger.de/uploads/images/gallery/2025-10/scaled-1680-/rpiimage.png)](https://kb.oliver-karger.de/uploads/images/gallery/2025-10/rpiimage.png)
[![image.png](https://kb.oliver-karger.de/uploads/images/gallery/2025-10/scaled-1680-/XFDimage.png)](https://kb.oliver-karger.de/uploads/images/gallery/2025-10/XFDimage.png)
[![image.png](https://kb.oliver-karger.de/uploads/images/gallery/2025-10/scaled-1680-/q1Kimage.png)](https://kb.oliver-karger.de/uploads/images/gallery/2025-10/q1Kimage.png)
### Bind SSL-VPN to new Loopback Interface

[![image.png](https://kb.oliver-karger.de/uploads/images/gallery/2025-10/scaled-1680-/C8yimage.png)](https://kb.oliver-karger.de/uploads/images/gallery/2025-10/C8yimage.png)
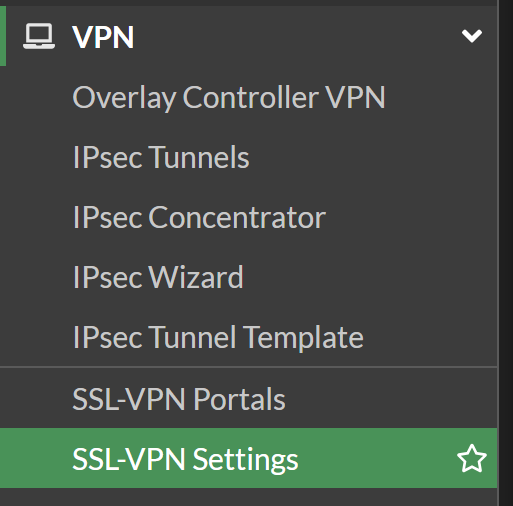
[![image.png](https://kb.oliver-karger.de/uploads/images/gallery/2025-10/scaled-1680-/AQ0image.png)](https://kb.oliver-karger.de/uploads/images/gallery/2025-10/AQ0image.png)

### Redirect SSL-VPN Traffic

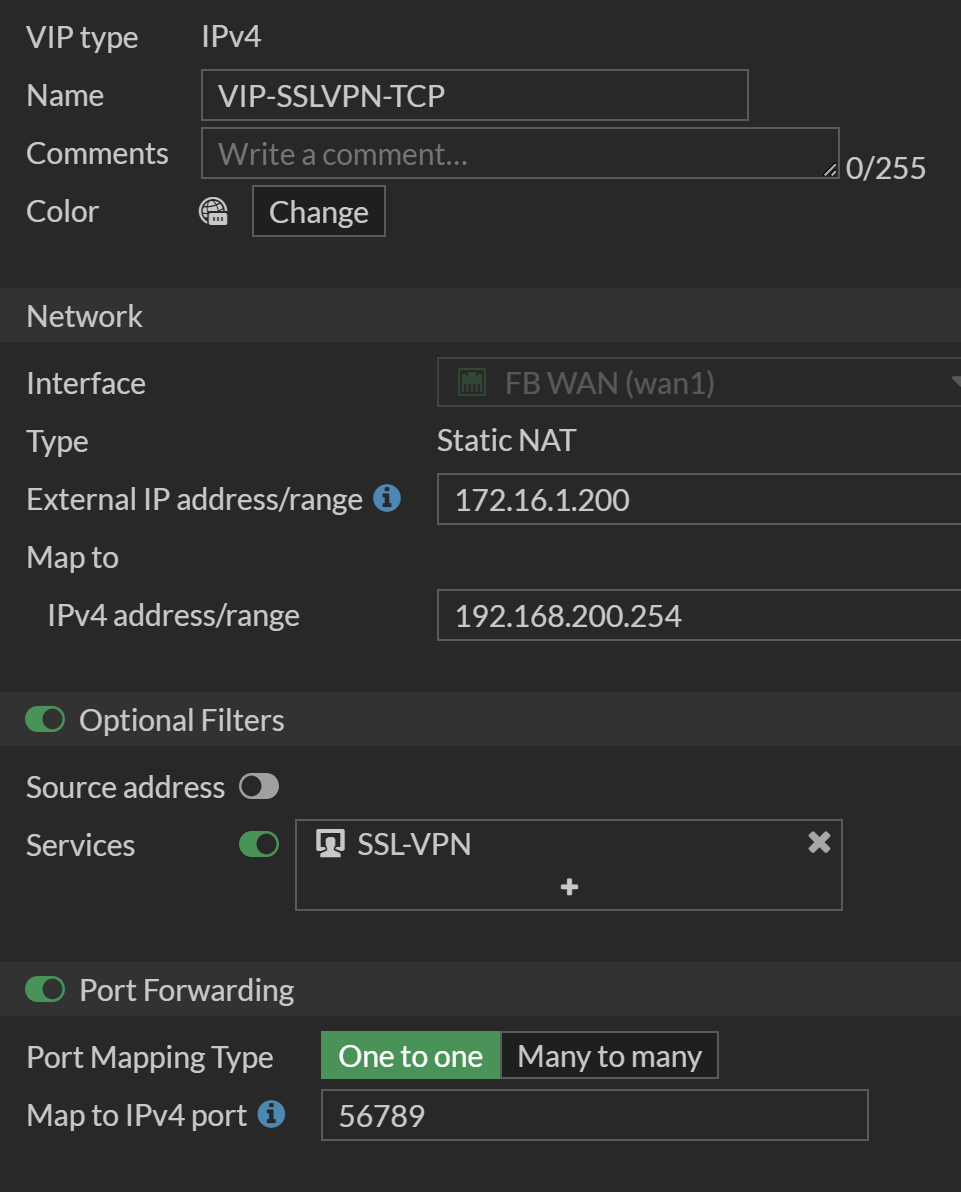
We now need to make sure the SSL-VPN Traffic actually reaches the new SSL-VPN Interface. We will use a Virtual IP with Port Forwarding for that.

[![image.png](https://kb.oliver-karger.de/uploads/images/gallery/2025-10/scaled-1680-/YLeimage.png)](https://kb.oliver-karger.de/uploads/images/gallery/2025-10/YLeimage.png)
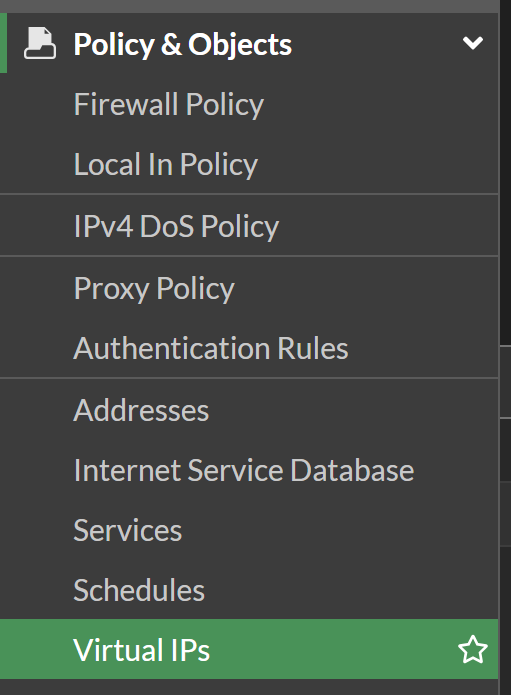
[![image.png](https://kb.oliver-karger.de/uploads/images/gallery/2025-10/scaled-1680-/9SAimage.png)](https://kb.oliver-karger.de/uploads/images/gallery/2025-10/9SAimage.png)
[![image.png](https://kb.oliver-karger.de/uploads/images/gallery/2025-10/scaled-1680-/uGlimage.png)](https://kb.oliver-karger.de/uploads/images/gallery/2025-10/uGlimage.png)
### Allow Traffic to new Interface

[![image.png](https://kb.oliver-karger.de/uploads/images/gallery/2025-10/scaled-1680-/exOimage.png)](https://kb.oliver-karger.de/uploads/images/gallery/2025-10/exOimage.png)
[![image.png](https://kb.oliver-karger.de/uploads/images/gallery/2025-10/scaled-1680-/tsvimage.png)](https://kb.oliver-karger.de/uploads/images/gallery/2025-10/tsvimage.png)

[![image.png](https://kb.oliver-karger.de/uploads/images/gallery/2025-10/scaled-1680-/adOimage.png)](https://kb.oliver-karger.de/uploads/images/gallery/2025-10/adOimage.png)
# Setup of Public Captive Portal

### 1. Portal basic Settings

##### Configure Certificate and enable HTTPS

```
config user setting
    set auth-cert "certificate"
    set auth-secure-http enable  
end
```

##### Set public FQDN / DNS Name

```
config firewall auth-portal
    set portal-addr "portal.company.com"
end
```

### 2. Configure public Port

It is recommended to explicitly set a public Port

```
config system global
    set auth-https-port 45443
end
```

### 3. Update Policies

Simply add your Users/Groups to the Policies.

# ASIC Offloading & VoIP Quality Issues

### **Problem Description**

<span class="">Real-time VoIP applications (Discord,</span><span class=""> Teams,</span><span class=""> Zoom) exhibit high latency (&gt;200ms) and packet loss,</span><span class=""> forcing a fallback to low-quality TCP relays.</span><span class=""> Audio input appears "damped,</span><span class="">" robotic,</span><span class=""> or near-silent to other participants,</span><span class=""> despite sounding perfect in local monitoring or DAW software.</span>

### Fix

1. **Disable Hardware Offloading:** Prevents the NPU from dropping fragmented UDP return traffic.
2. **Enable Fixed Port:** Forces the firewall to use the same internal source port for the external connection, allowing the upstream router to maintain the session.

<div _ngcontent-ng-c3630790347="" class="code-block ng-tns-c3630790347-400 ng-animate-disabled ng-trigger ng-trigger-codeBlockRevealAnimation" data-hveid="0" data-ved="0CAAQhtANahgKEwiMkKH8-MWSAxUAAAAAHQAAAAAQ1gU" decode-data-ved="1" id="bkmrk-bash" jslog="223238;track:impression,attention;BardVeMetadataKey:[["r_2066c64740d04307","c_ea41d4cb6af9981e",null,"rc_12a9f457fc195cc0",null,null,"en",null,1,null,null,1,0]]"><div _ngcontent-ng-c3630790347="" class="formatted-code-block-internal-container ng-tns-c3630790347-400"><div _ngcontent-ng-c3630790347="" class="animated-opacity ng-tns-c3630790347-400">  
</div></div></div>```
config firewall policy
    edit <POLICY_ID>
        # Force traffic to main CPU (Software Processing)
        set auto-asic-offload disable
        set np-acceleration disable

        # Prevent Port Translation
        set nat enable
        set fixedport enable

        # Disable Deep Inspection for Real-Time Traffic
        set utm-status disable
        set ssl-ssh-profile "no-inspection"
    next
end

```

<div _ngcontent-ng-c3630790347="" class="code-block ng-tns-c3630790347-400 ng-animate-disabled ng-trigger ng-trigger-codeBlockRevealAnimation" data-hveid="0" data-ved="0CAAQhtANahgKEwiMkKH8-MWSAxUAAAAAHQAAAAAQ1gU" decode-data-ved="1" id="bkmrk--1" jslog="223238;track:impression,attention;BardVeMetadataKey:[["r_2066c64740d04307","c_ea41d4cb6af9981e",null,"rc_12a9f457fc195cc0",null,null,"en",null,1,null,null,1,0]]"><div _ngcontent-ng-c3630790347="" class="formatted-code-block-internal-container ng-tns-c3630790347-400"><div _ngcontent-ng-c3630790347="" class="animated-opacity ng-tns-c3630790347-400"></div></div></div>*After applying, clear active sessions to force a fresh handshake*

```
diagnose sys session filter dport 50000 65535
diagnose sys session clear
```

# IKEv2 VPN

**General Use IKEv2 VPN for FortiClient**

## FortiGate Configuration

### Phase 1

```
edit "VPN-RA-FC"
    set type dynamic
    set interface "wan1"
    set ike-version 2
    set peertype any
    set net-device disable
    set mode-cfg enable
    set ipv4-dns-server1 10.0.0.254
    set internal-domain-list "<removed>"
    set proposal aes256gcm-prfsha384 aes256gcm-prfsha256 aes256-sha256
    set localid "<removed>"
    set dpd on-idle
    set dhgrp 21 19 14
    set eap enable
    set eap-identity send-request
    set authusrgrp "VPN Users"
    set assign-ip-from name
    set ipv4-split-include "GRP-VPN-ACCESS"
    set ipv4-name "RNG-RA-VPN-Clients"
    set psksecret <removed>
    set dpd-retryinterval 60
next
```

- `internal-domain-list` is a List of DNS Domains that should be resolveable by the connected Device (internal Domains only)
- `localid` is the public DNS Domain of the Firewall (required)
- `psksecret` is the Pre-Shared-Key

### Phase 2

```
edit "VPN-RA-FC-P2-DEFAULT"
    set phase1name "VPN-RA-FC"
    set proposal aes256gcm aes256-sha256
    set dhgrp 21 19 14
    set keepalive enable
    set keylifeseconds 3600
next
```

###   


### Policies

```
config firewall policy
    edit 18
        set name "Allow-VPN-RA-to-LAN"
        set uuid b88f102a-dff6-51f0-6157-49a1d9450327
        set srcintf "VPN-RA-APPLE" "VPN-RA-WINDOWS" "VPN-RA-FC"
        set dstintf "VLAN-LAN-100" "SSID-WLAN-TUN" "SSID-IOT-TUN" "VLAN-DMZ-200"
        set action accept
        set srcaddr "RNG-RA-VPN-Clients"
        set dstaddr "GRP-VPN-ACCESS"
        set schedule "always"
        set service "ALL"
    next
    edit 20
        set name "Allow-VPN-RA-to-WAN"
        set uuid ee369aec-dff9-51f0-c276-83956b56cd9c
        set srcintf "VPN-RA-APPLE" "VPN-RA-FC" "VPN-RA-WINDOWS"
        set dstintf "wan1"
        set action accept
        set srcaddr "RNG-RA-VPN-Clients"
        set dstaddr "all"
        set schedule "always"
        set service "ALL"
        set nat enable
    next
end
```

## Client Configuration

### iOS FortiClient App

<table border="1" id="bkmrk-secure-protocol-ikev" style="border-collapse: collapse; width: 100%;"><colgroup><col style="width: 50.0542%;"></col><col style="width: 50.0542%;"></col></colgroup><tbody><tr><td>Secure Protocol</td><td>IKEv2 VPN</td></tr><tr><td>Name</td><td>&lt;Name&gt;</td></tr><tr><td>Server Address</td><td>Public DNS Domain (same as localid in Tunnel Config)</td></tr><tr><td>Authentication Method</td><td>Pre-shared Key</td></tr><tr><td>Pre-shared Key Secret</td><td>PSK</td></tr><tr><td>EAP-AUTH</td><td>Enabled</td></tr><tr><td>Local ID</td><td>empty</td></tr><tr><td>Remote-ID</td><td>Public DNS Domain (same as localid in Tunnel Config)</td></tr><tr><td>Phase 1 Encryption</td><td>AES256</td></tr><tr><td>Phase 1 Authentication</td><td>SHA256</td></tr><tr><td>Phase 1 DH GRoup</td><td>14</td></tr><tr><td>Phase 1 Key Lifetime</td><td>86400</td></tr><tr><td>Phase 1 Encryption</td><td>AES256</td></tr><tr><td>Phase 1 Authentication</td><td>SHA256</td></tr><tr><td>Phase 1 DH GRoup</td><td>14</td></tr><tr><td>Phase 1 Key Lifetime</td><td>43200</td></tr><tr><td>DPD</td><td>enabled</td></tr><tr><td>PFS</td><td>enabled</td></tr><tr><td>Username</td><td>Client Username (User in FortiGate)</td></tr></tbody></table>

# SSO with Keycloak

### Requirements

- FortiGate with at least FortiOS 7.X
- Keycloak (26.X ideally)

<p class="callout info">This has been tested with Keycloak 26.X and FortiOS 7.6.6</p>

<p class="callout warning">Realm names in Keycloak are case-sensitive. Ensure all URLs referencing the realm name use the exact same casing (e.g. `MyRealm` not `myrealm`).</p>

<p class="callout warning">You need a separate Keycloak client for each FortiGate SSO use case. For example: one client for Admin SSO and one for User SSO (firewall policy authentication). This allows separate access restrictions per use case.</p>

### Keycloak Setup

The following steps apply to both the Admin SSO client and the User SSO client. Differences between the two are noted where applicable.

#### Step 1: Create the Keycloak Client (basic)

1. Log into Keycloak and go to *Clients*
2. Create a new Client of Type *SAML* and set the Client ID: 
    - **Admin SSO:** `http://<your-fortigate-fqdn>/metadata/`
    - **User SSO:** `http://<your-fortigate-fqdn>/remote/saml/metadata/`
    
    <p class="callout warning">Note the trailing slash — it must be present. The Client ID must be a byte-for-byte match of the Issuer value sent by FortiGate in its SAMLRequest.</p>
3. Finish the Create Client wizard with default settings for now

#### Step 2: Client Settings (advanced)

- General Settings 
    - Set a display name for *Name*
    - Optionally set a *Logo URI* to display a logo on the account console. For FortiGate clients the official Fortinet logo is available at:  
        `https://upload.wikimedia.org/wikipedia/commons/6/62/Fortinet_logo.svg`  
        <p class="callout info">The Logo URI is only shown in the Keycloak account console, not on the login page itself. To show a logo on the login page, a custom theme is required.</p>
- Access settings 
    - Set your FortiGate address as *Root URL* and *Home URL*
    - Set *Valid Redirect URIs*: 
        - **Admin SSO:** `https://<your-fortigate-fqdn>/saml/?acs`
        - **User SSO:** `https://<your-fortigate-fqdn>/remote/saml/?acs`
    - Set *Master SAML Processing URL* to the same value as Valid Redirect URIs above
- SAML capabilities 
    - Set *Name ID Format* to *username*
    - Enable *Force POST Binding*
- Signature and Encryption 
    - Enable *Sign documents*
    - Enable *Sign assertions*
- Keys tab 
    - Set *Client Signature Required* to *Off* — FortiGate does not sign AuthnRequests
- Logout settings (Settings tab) 
    - Enable *Front channel logout*
    - Set *Logout service POST binding URL*: 
        - **Admin SSO:** `https://<your-fortigate-fqdn>/saml/?sls`
        - **User SSO:** `https://<your-fortigate-fqdn>/remote/saml/?sls`
    - Set *Logout service Redirect binding URL* to the same value as above
- Logout settings (Advanced tab) 
    - Set *Backchannel logout URL*: 
        - **Admin SSO:** `https://<your-fortigate-fqdn>/saml/?sls`
        - **User SSO:** `https://<your-fortigate-fqdn>/remote/saml/?sls`
    - Enable *Backchannel logout session required*

#### Step 3: Add Username Attribute Mapper

Without a username mapper, FortiGate will reject the SAML assertion as it contains no username attribute.

1. Go to *Clients → your client → Client scopes → (client)-dedicated → Add mapper → By configuration*
2. Select *User Property* and configure: 
    - *Name:* `username`
    - *Property:* `username`
    - *SAML Attribute Name:* `username`
    - *SAML Attribute NameFormat:* `Basic`
3. Save

### Access Restriction (Optional)

By default, any user in Keycloak can authenticate through the client. To restrict access to a specific group, follow the steps below. Repeat this process for each client with its own role and group.

<p class="callout info">This works by creating a realm role, assigning it to a group, and then creating a custom authentication flow that denies access to users who do not have that role.</p>

#### Step 1: Create a Realm Role

1. Go to *Realm roles → Create role*
2. Set a name for the role (e.g. `Firewall Admins` or `Firewall Users`)
3. Save

#### Step 2: Assign the Role to a Group

1. Go to *Groups → your desired group → Role mapping*
2. Click *Assign role*
3. Select the role created in Step 1 and assign it

<p class="callout info">All members of the group will automatically inherit the role. If you use AD/LDAP federation, make sure group sync is configured so group memberships are reflected in Keycloak.</p>

#### Step 3: Create a Custom Authentication Flow

1. Go to *Authentication → Flows*
2. Click on *Browser → Action → Duplicate*
3. Give it a descriptive name (e.g. `Browser - Firewall Admins`) and confirm
4. Open the duplicated flow
5. Click *Add sub-flow* at the top level: 
    - *Name:* `Role Check`
    - *Requirement:* `Conditional`
6. Inside the *Role Check* sub-flow, click *Add condition*: 
    - Select *Condition - User Role*
    - *Requirement:* `Condition`
    - Click the settings (pencil) icon and set: 
        - *Role:* select the role created in Step 1
        - *Negate:* `On`
7. Inside the *Role Check* sub-flow, click *Add step*: 
    - Select *Deny Access*
    - *Requirement:* `Required`

<p class="callout warning">The Negate toggle is critical. With Negate On, the condition matches users who do **not** have the role, causing them to be denied. Without Negate, users **with** the role would be denied instead.</p>

#### Step 4: Bind the Flow to the Client

1. Go to *Clients → your client → Advanced tab*
2. Scroll to *Authentication flow overrides*
3. Set *Browser flow* to your newly created flow
4. Save

### FortiGate Setup

#### Preparation — Import Keycloak Certificate

<p class="callout warning">Make sure to download the certificate from your specific realm's metadata endpoint, not the master realm. Each realm has its own signing key.</p>

1. Open `https://<your-keycloak-uri>/realms/<realm-name>/protocol/saml/descriptor` in your browser
2. Find the `<ds:X509Certificate>` value and copy it
3. Paste the content into a text file, wrapping it as follows: ```
    -----BEGIN CERTIFICATE-----
    <paste certificate content here>
    -----END CERTIFICATE-----
    ```
4. Save the file with a `.crt` extension
5. Log into FortiGate and go to *System → Certificates*
6. Click *Create/Import → Remote Certificate*
7. Upload the file and note the assigned name (usually `REMOTE_Cert_X`)

#### Admin SSO Configuration

1. Log into FortiGate and go to *Security Fabric → Fabric Connectors*
2. Right-click on *Security Fabric Setup → Edit → Single Sign-On Settings*: 
    - Set *Mode* to *Service Provider (SP)*
    - Click *Use current browser address* to automatically configure the SP Address
    - Configure the *Default admin profile* to your desired settings
    - IdP Settings: 
        - Set *IdP type* to *Custom*
        - Set *IdP certificate* to the imported certificate name (e.g. `REMOTE_Cert_X`)
        - Set *IdP entity ID* to `https://<your-keycloak-uri>/realms/<realm-name>`
        - Set *IdP single sign-on URL* to `https://<your-keycloak-uri>/realms/<realm-name>/protocol/saml`
        - Set *IdP single logout URL* to `https://<your-keycloak-uri>/realms/<realm-name>/protocol/saml`

#### User SSO Configuration (Firewall Policy Authentication)

1. Log into FortiGate and go to *User &amp; Authentication → Single Sign-On → Create New*
2. Configure the following: 
    - Set *Type* to *Custom*
    - Set *Address* to your FortiGate FQDN or IP — the SP Entity ID, ACS URL, and SLO URL will auto-populate
    - Set *Attribute used to identify users* to `username`
    - Set *Attribute used to identify groups* to `group`
    - IdP Settings: 
        - Set *IdP type* to *Custom*
        - Set *Certificate* to the imported certificate name (e.g. `REMOTE_Cert_X`)
        - Set *IdP entity ID* to `https://<your-keycloak-uri>/realms/<realm-name>`
        - Set *IdP single sign-on URL* to `https://<your-keycloak-uri>/realms/<realm-name>/protocol/saml`
        - Set *IdP single logout URL* to `https://<your-keycloak-uri>/realms/<realm-name>/protocol/saml`
3. Save the SSO configuration
4. Go to *User &amp; Authentication → User Definition → Create New*: 
    - Set *User Type* to *SAML*
    - Set *Username* to a name for this SAML user (e.g. `keycloak-users`)
    - Set *SAML SSO Server* to the SSO configuration created above
5. Go to *User &amp; Authentication → User Groups → Create New*: 
    - Add the SAML user definition as a *Member*
6. Apply the user group to a *Firewall Policy* under *Policy &amp; Objects → Firewall Policy → Source*

<p class="callout info">Users matching a firewall policy with this group will be prompted to authenticate via Keycloak SAML before traffic is allowed through.</p>