Policy based IPsec VPN (IKEv1)
What will be done
- Setup a IKEv1 Remote Access VPN with PSK + XAuth Authentication
- Policy-based Split Tunneling
Prerequesits
- Static IP
- Port 500 (UDP) for IKE open
- Port 4500 (UDP) for NAT-T open
- ESP open
- User Group for XAuth
I'll be referring to this Tunnel as VPN-RA-Test. Give it whatever name you need!
1. Creating a VPN Tunnel
- Go to VPN - IPsec Tunnels
- Click Create New and select IPsec Tunnel
- Template Type: Custom
- Name: VPN-RA
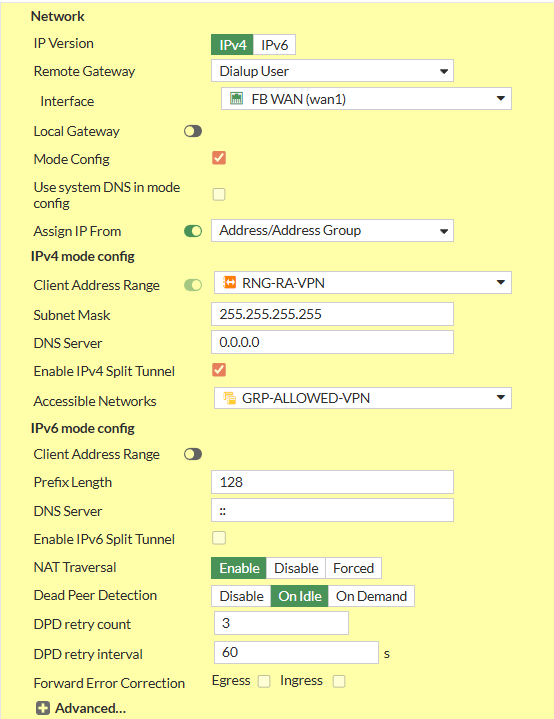
1.1. Network Settings
-
- Set IP Version to IPv4
- Set Remote Gateway to Dialup User
- Interface: Your WAN Interface
- Disable Local Gateway
- Enable Mode Config
- Set Client Address Range manually or Assign Range Address Object
- Set Subnet Mask
255.255.255.255to prevent Inter-Device Communication inside the Tunnel or specify explicitly - Set your preferred DNS Server.
- Enable Enable IPv4 Split Tunnel
- Select your Address Object representing the Networks that should be accessable
- Disable IPv6 Mode Config - Client Address Range
- Set NAT Traversal to Enable
- Set Dead Peer Detection to On Idle
1.2. Authentication
- Set Method to Pre-shared Key
- Write your PSK to the Pre-shared Key Input Field
- Set IKE - Version to 1
- Set IKE - Mode to Agressive
- Set Peer Options - Accept Types to Any Peer ID
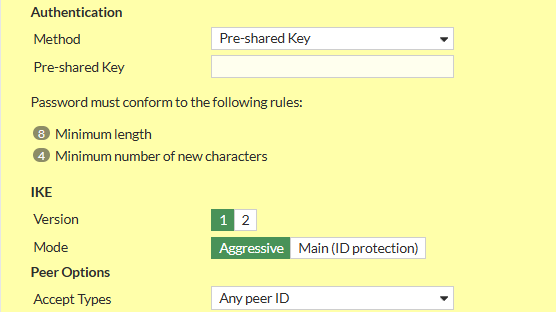
You can set a Peer ID here to differentiate different Tunnels that might share Settings and/or PSKs
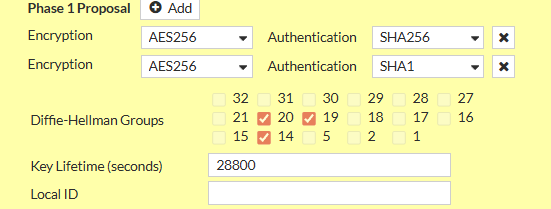
1.3. Phase 1 Proposal
Remove all existing Phase 1 Proposals beforehand by clicking the X Button the right side
- Add the following Proposals
- Encryption: AES256, Authentication: SHA256
- Encryption: AES256, Authentication: SHA1
- Check Diffie-Hellmann Groups 14, 19, 20
- Set Key Lifetime (seconds) to 28800
1.4. XAuth
- Set Type to Auto Server
- Set User Group to Inherit from policy

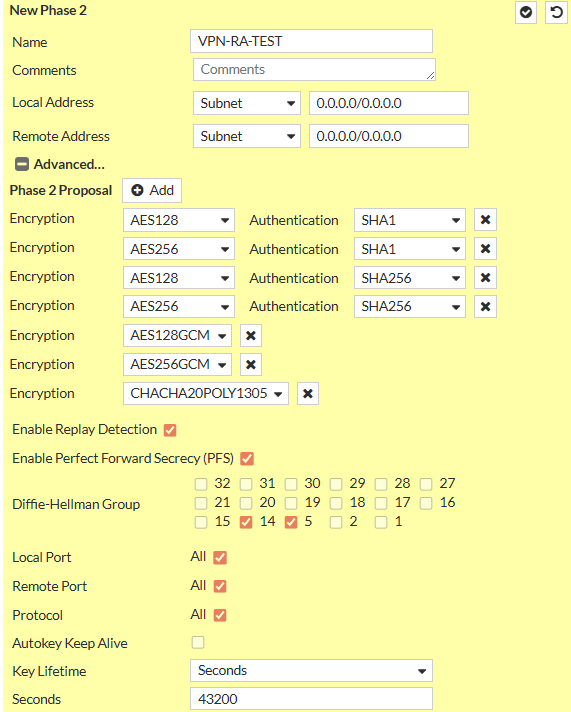
1.5. Phase 2 Selectors
There should only be one Phase 2 Selector pre-existing with the Name of the Tunnel you specified
1.5.1 Edit Default Phase 2 Selector
- Click on the Pen Icon at the Right Side of the Row to Edit
- Expand the Advanced Menu by clicking on Advanced
- Set Name to VPN-RA-P2
- Set Local Address to Type Subnet and Value
0.0.0.0/0 - Set Remote Address to Type Subnet and Value
0.0.0.0/0 - Delete all existing Phase 2 Proposals
- Add the following Phase 2 Proposals (same as with Phase 1)
- Encryption: AES256, Authentication: SHA256
- Encryption: AES256, Authentication: SHA1
- Enable Enable Replay Detection
- Enable Enable Perfect Forward Secrecy (PFS)
- Check Diffie-Hellmann Groups 14, 19, 20
- Enable Local Port
- Enable Remote Port
- Enable Protocol
- Set Key Lifetime to Seconds and set
3600