Policy based IPsec VPN (IKEv1)
What will be done
- Setup a IKEv1 Remote Access VPN with PSK + XAuth Authentication
- Policy-based Split Tunneling
Prerequesits
- Static IP
- Port 500 (UDP) for IKE open
- Port 4500 (UDP) for NAT-T open
- ESP open
- User Group for XAuth
I'll be referring to this Tunnel as VPN-RA-Test. Give it whatever name you need!
1. Creating a VPN Tunnel
- Go to VPN - IPsec Tunnels
- Click Create New and select IPsec Tunnel
- Template Type: Custom
- Name: VPN-RA
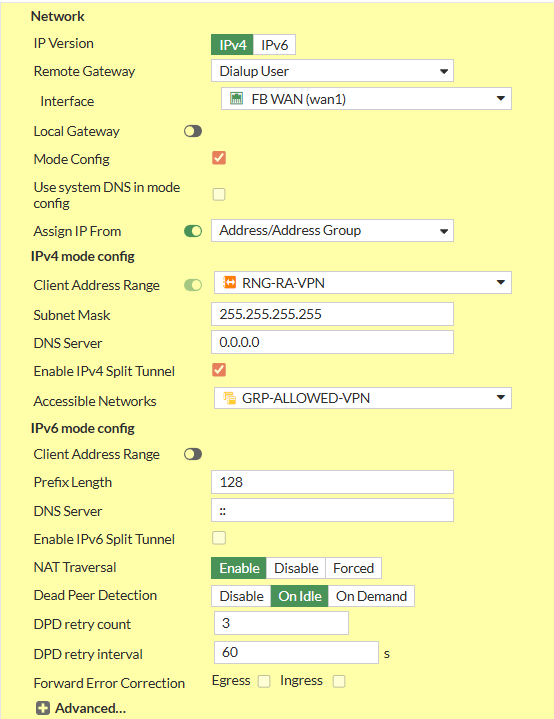
1.1. Network Settings
-
- Set IP Version to IPv4
- Set Remote Gateway to Dialup User
- Interface: Your WAN Interface
- Disable Local Gateway
- Enable Mode Config
- Set Client Address Range manually or Assign Range Address Object
- Set Subnet Mask
255.255.255.255to prevent Inter-Device Communication inside the Tunnel or specify explicitly - Set your preferred DNS Server.
- Enable Enable IPv4 Split Tunnel
- Select your Address Object representing the Networks that should be accessable
- Disable IPv6 Mode Config - Client Address Range
- Set NAT Traversal to Enable
- Set Dead Peer Detection to On Idle
1.2. Authentication
- Set Method to Pre-shared Key
- Write your PSK to the Pre-shared Key Input Field
- Set IKE - Version to 1
- Set IKE - Mode to Agressive
- Set Peer Options - Accept Types to Any Peer ID
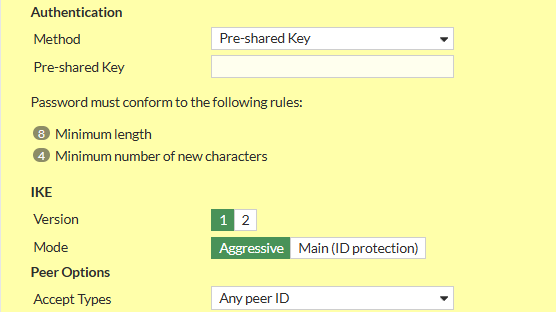
You can set a Peer ID here to differentiate different Tunnels that might share Settings and/or PSKs
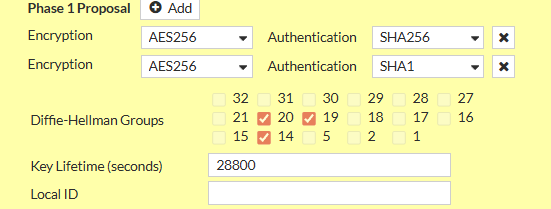
1.3. Phase 1 Proposal
Remove all existing Phase 1 Proposals beforehand by clicking the X Button the right side
- Add the following Proposals
- Encryption: AES256, Authentication: SHA256
- Encryption: AES256, Authentication: SHA1
- Check Diffie-Hellmann Groups 14, 19, 20
- Set Key Lifetime (seconds) to 28800
1.4. XAuth
- Set Type to Auto Server
- Set User Group to Inherit from policy

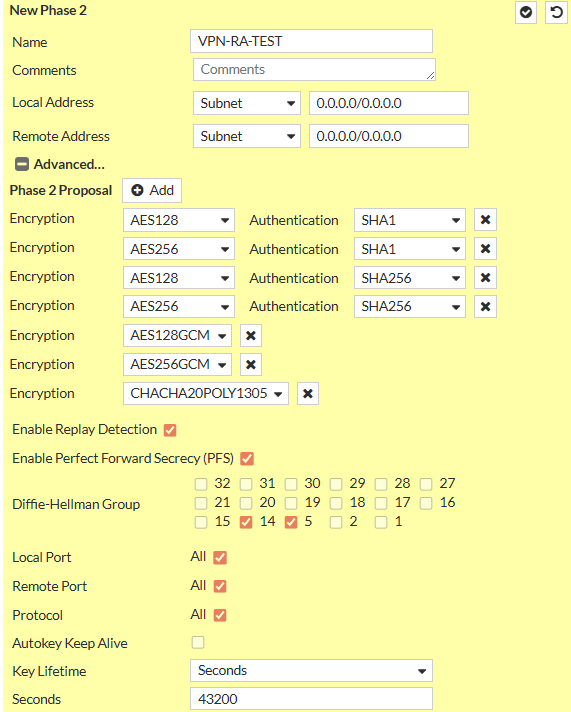
1.5. Phase 2 Selectors
There should only be one Phase 2 Selector pre-existing with the Name of the Tunnel you specified
1.5.1 Edit Default Phase 2 Selector
- Click on the Pen Icon at the Right Side of the Row to Edit
- Expand the Advanced Menu by clicking on Advanced
- Set Name to VPN-RA-P2
- Set Local Address to Type Subnet and Value
0.0.0.0/0 - Set Remote Address to Type Subnet and Value
0.0.0.0/0 - Delete all existing Phase 2 Proposals
- Add the following Phase 2 Proposals (same as with Phase 1)
- Encryption: AES256, Authentication: SHA256
- Encryption: AES256, Authentication: SHA1
- Enable Enable Replay Detection
- Enable Enable Perfect Forward Secrecy (PFS)
- Check Diffie-Hellmann Groups 14, 19, 20
- Enable Local Port
- Enable Remote Port
- Enable Protocol
- Set Key Lifetime to Seconds and set
3600
2. Create Policies
For a Policy-based IPsec VPN you need Policies that allow both the Address Range of the Clients and the Users to access the Networks you need.
Depending on the Networks you specified, you need Policies from WAN->LAN and maybe WAN->OtherLAN.
2.1 Example Policy
This is an Example Policy from WAN to LAN
I use Address Objects here that i also specified in the Tunnel Configuration.
Note: You cannot specifiy Subnet Address Objects in the Tunnel Configuration, only IP Ranges. But if the Subnet contains the IP Range, this works fine. Example: Range is 192.168.10.100 - 192.168.10.200 so a Subnet of 192.168.10.0/24 would work just fine
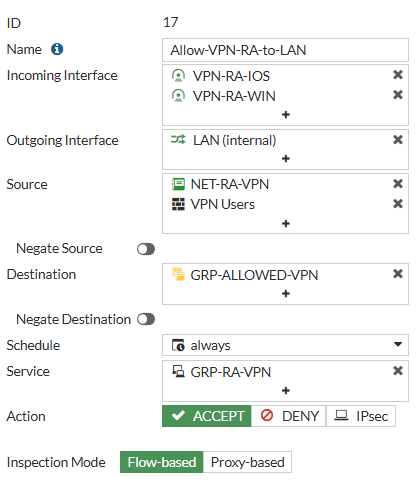
Here my Policies allows Traffic from the VPN Tunnel Interfaces (created when creating the Tunnel) to the LAN Interface. As here, Authentication is Policy-based, for the Source we also need the User/User Groups.
Destination is a Group i created that is the same i used for the Split Tunneling - Accessable Networks
You can also specify a Schedule or Service if you want to.
You need Policies in both Directions for them to work correctly!